Raspberry Pi Camera: Difference between revisions
Jump to navigation
Jump to search
(Created page with "A raspberry pi 4 model B (4GB) is used to mount the camera. The camera model is Arducam Lens Board OV5647. = web interface = == installation == https://elinux.org/RPi-Cam-Web-Interface once installed, the web interface will autostart at the start up. connect port = 80") |
No edit summary |
||
| (21 intermediate revisions by the same user not shown) | |||
| Line 1: | Line 1: | ||
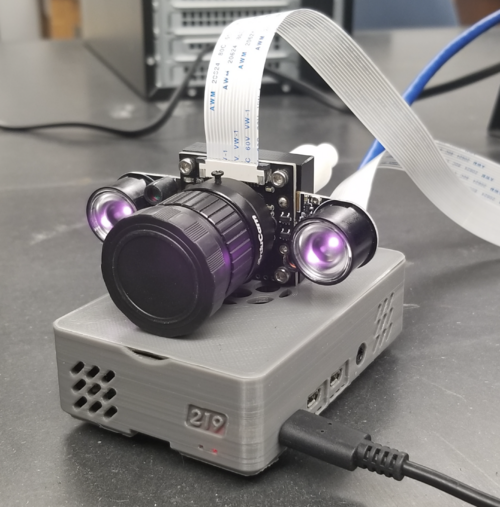
[[File:Picture of the raspberry pi and the camera.png|thumb|500px|right|Picture of the raspberry pi and the night vision camera with IR leds]] | |||
a Raspberry Pi 4 Model B 2019 Quad Core 64 Bit WiFi Bluetooth (4GB) is used to mount the camera. The camera model is Arducam Lens Board OV5647. | |||
To access the web interface http://pi01.physics.fsu.edu/html/ | |||
{{Notice | When in Target Room 2, it has wifi connection to 192.168.3.17}} | |||
[https://fsunuc.physics.fsu.edu/elog/LabMaintenance/2 login information] | |||
Also, the VNC server is enabled on the raspberry pi. | |||
{{Warning | Please shutdown properly before take out the power}} | |||
= Cam module = | |||
* Lens Board OV5647 Sensor for Raspberry Pi Camera, Arducam Adjustable and Interchangeable Lens M12 Module, Focus and Angle Enhancement for Raspberry Pi 4/3/3 B+ | |||
* Arducam Noir Camera for Raspberry Pi, Interchangeable CS Mount Lens LS-2717CS, OV5647 5MP 1080P | |||
== Lens == | |||
* Arducam CS-Mount Lens for Raspberry Pi HQ Camera, 16mm Focal Length with Manual Focus and Adjustable Aperture | |||
= web interface = | = web interface = | ||
| Line 6: | Line 26: | ||
https://elinux.org/RPi-Cam-Web-Interface | https://elinux.org/RPi-Cam-Web-Interface | ||
once installed, the web interface will autostart at the start up. | once installed, the web interface will autostart at the start-up. | ||
connect port = 80 | connect port = 80 | ||
= Setup the raspberry pie = | |||
Get the raspberry pie image https://www.raspberrypi.com/software/ | |||
in Ubunutu | |||
sudo apt install rpi-imager | |||
In the imager, don't forget to set the ssh id and password. | |||
after that, insert the SD card into the PC. | |||
= IP = | |||
128.186.111.100 | |||
nickname: pi01 (not username) | |||
= Spare raspberry pi = | |||
We have a raspberry pi 5 B for spare, IP = 103, name pi02 | |||
Latest revision as of 16:04, 10 March 2025
a Raspberry Pi 4 Model B 2019 Quad Core 64 Bit WiFi Bluetooth (4GB) is used to mount the camera. The camera model is Arducam Lens Board OV5647.
To access the web interface http://pi01.physics.fsu.edu/html/
| When in Target Room 2, it has wifi connection to 192.168.3.17 |
Also, the VNC server is enabled on the raspberry pi.
Cam module
- Lens Board OV5647 Sensor for Raspberry Pi Camera, Arducam Adjustable and Interchangeable Lens M12 Module, Focus and Angle Enhancement for Raspberry Pi 4/3/3 B+
- Arducam Noir Camera for Raspberry Pi, Interchangeable CS Mount Lens LS-2717CS, OV5647 5MP 1080P
Lens
- Arducam CS-Mount Lens for Raspberry Pi HQ Camera, 16mm Focal Length with Manual Focus and Adjustable Aperture
web interface
installation
https://elinux.org/RPi-Cam-Web-Interface
once installed, the web interface will autostart at the start-up.
connect port = 80
Setup the raspberry pie
Get the raspberry pie image https://www.raspberrypi.com/software/
in Ubunutu
sudo apt install rpi-imager
In the imager, don't forget to set the ssh id and password.
after that, insert the SD card into the PC.
IP
128.186.111.100
nickname: pi01 (not username)
Spare raspberry pi
We have a raspberry pi 5 B for spare, IP = 103, name pi02
